
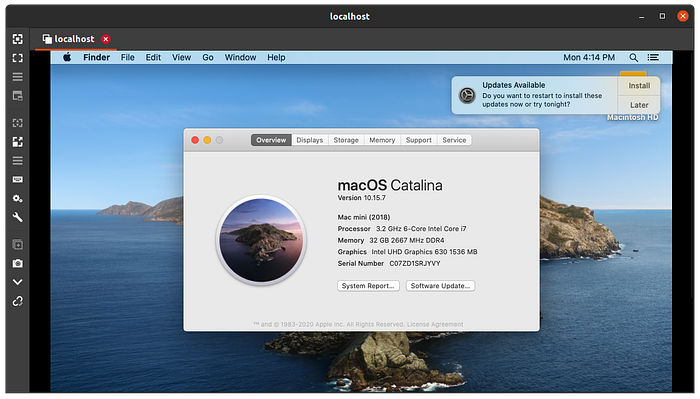
➜ Mac instances natively support the macOS operating system (Mojave 10.14 & Catalina 10.15) with Mac mini hardware and powered by 3.2 GHz Intel eighth-generation (Coffee Lake) Core i7 processors. ‘
➜ Cost estimate
1 instance(s) x 1.354 USD hourly x 730 hours in a month = 988.4200 USD (EC2 Dedicated Hosts)
100 GB x 0.12 USD x 1 instance(s) = 12.00 USD (EBS Storage Cost)
⠀⠀⠀⠀⠀⠀⠀⠀⠀⠀⠀⠀⠀Total: 1000.42 USD/mo*
➜Available regions
⠀⠀⠀⠀⠀⠀⠀⠀N. Virginia
⠀⠀⠀⠀⠀⠀⠀⠀Ohio
⠀⠀⠀⠀⠀⠀⠀⠀Oregon
⠀⠀⠀⠀⠀⠀⠀⠀Ireland
⠀⠀⠀⠀⠀⠀⠀⠀Singapore
Step: 1
Create Aws Account — https://aws.amazon.com/
Step: 2
Create Dedicated host
‣Type “Dedicated Hosts” in a aws console search bar
‣Click on “Allocate Dedicated Host”
⠀⠀⠀Name tag: Identifying name you wish to provide to the Dedicated host
⠀⠀⠀Instance family: Select “mac1” to run man instances
⠀⠀⠀Support multiple instance types: enable the checkbox
⠀⠀⠀Instance type: select “mac1.metal” from the drop down
⠀⠀⠀Availability Zone: select any (for beginners)
⠀⠀⠀Instance auto-placement: enable the checkbox
⠀⠀⠀Host recovery: enable the checkbox
‣Click “Allocate”


⠀⠀⠀[The service may take upto 20 minutes to spin up dedicated hosts environment, periodically check the “State” of newly created host, when state = available, we can move on to next step]
Step: 3
Open to EC2 service console and click on “Launch Instances”

‣choose any one of the image [Catalina 10.15 seems to be with less issues , AMI-ami-05b5797a8b0de9900].

‣choose “mac1.metal” from instance type list(- ECUs, 12 vCPUs, 3.2 GHz, -, 32 GiB memory, EBS only)
‣In Configure Instance Details, Select our newly created Dedicated hoat from drop down list of “Host”

‣if your dedicated host state != available, then this drop down will never show your dedicated host. Restarted dedicated host may take unto 30min to show up in this list.
‣In Add Storage section provide with necessary space !
‣Follow the normal procedure for Add Tags, Configure Security Group and Review stages.
‣ Hit “launch” and save the Key file (pem — private key) for accessing the instance.
Setup VNC for desktop view
Step: 1
On your local system, connect to the Mac EC2 instance with SSH protocol. [Putty software for Windows users and Terminal for Linux OS users]
Step: 2
Host IP: Public IP provided by AWS (in ec2 instance details section)
UserName: ec2-user
Keyfile: File downloaded while creating EC2 instance
ssh -i <your private key.pem> ec2-user@<your public ip address>Step: 3
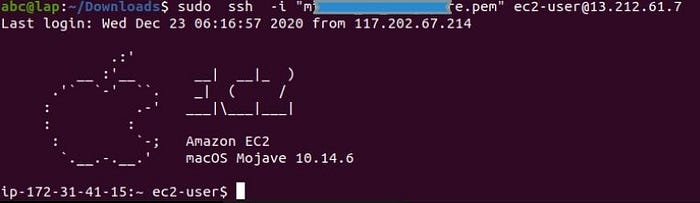
After logging into the Mac Instance, we need to provide a password for the default user. Run this command to set password for “ec2-user” user.
sudo passwd ec2-userThen Enable VNC Server by entering the command,
Open port default VNC port 5900 of Mac insence in AWS, and open second terminal in laptop to create a SSH tunnel to Mac EC2
ssh -L 5900:localhost:5900 -C -N -i <your private key.pem> ec2-user@<your public ip address>then try to access the VNC via Remmina Remote Desktop client or Tiger VNC or open vnc://localhost:5900 in browser
[username: ec2-user and password: as specified earlier in terminal ]

Success !!
if you face any storage space issues [like under reporting specified storage space in AWS] run the command -
